> ## Documentation Index
> Fetch the complete documentation index at: https://docs.dqlabs.ai/llms.txt
> Use this file to discover all available pages before exploring further.
# Snowflake Setup
> Prerequisites, authentication options, and step-by-step instructions for connecting Snowflake to Prizm.
## Prerequisites
Before connecting, create a dedicated Prizm role in Snowflake and grant it the minimum required permissions. Run the script below for each database you want to include.
```sql theme={null}
-- Create a role for Prizm
CREATE ROLE IF NOT EXISTS PRIZM_ROLE;
-- Grant usage on the warehouse
GRANT USAGE ON WAREHOUSE TO ROLE PRIZM_ROLE;
-- Grant access to the target database and schemas
GRANT USAGE ON DATABASE TO ROLE PRIZM_ROLE;
GRANT USAGE ON ALL SCHEMAS IN DATABASE TO ROLE PRIZM_ROLE;
GRANT USAGE ON FUTURE SCHEMAS IN DATABASE TO ROLE PRIZM_ROLE;
-- Grant read-only access to tables and views
GRANT SELECT ON ALL TABLES IN DATABASE TO ROLE PRIZM_ROLE;
GRANT SELECT ON FUTURE TABLES IN DATABASE TO ROLE PRIZM_ROLE;
GRANT SELECT ON ALL VIEWS IN DATABASE TO ROLE PRIZM_ROLE;
GRANT SELECT ON FUTURE VIEWS IN DATABASE TO ROLE PRIZM_ROLE;
-- Required for: ACCOUNT_USAGE, lineage, tag sync, performance metrics
GRANT IMPORTED PRIVILEGES ON DATABASE SNOWFLAKE TO ROLE PRIZM_ROLE;
-- Grant monitor on pipes and tasks (pipeline observability)
GRANT MONITOR ON ALL PIPES IN DATABASE TO ROLE PRIZM_ROLE;
```
The IMPORTED PRIVILEGES grant on the SNOWFLAKE shared database is required for tag sync, pipeline observability, performance metrics, and Enterprise lineage. Without it, those features will be unavailable.
### IP Whitelisting
If your organization uses a whitelist to manage Snowflake access, Prizm will only access your Snowflake database through the following IP addresses. Add these to your Snowflake network policy before connecting.
| Cloud Platform | Region | IP Addresses |
| :------------- | :------------------- | :----------- |
| AWS | US-EAST-1 (Virginia) | `xxxxx` |
## Connector Setup
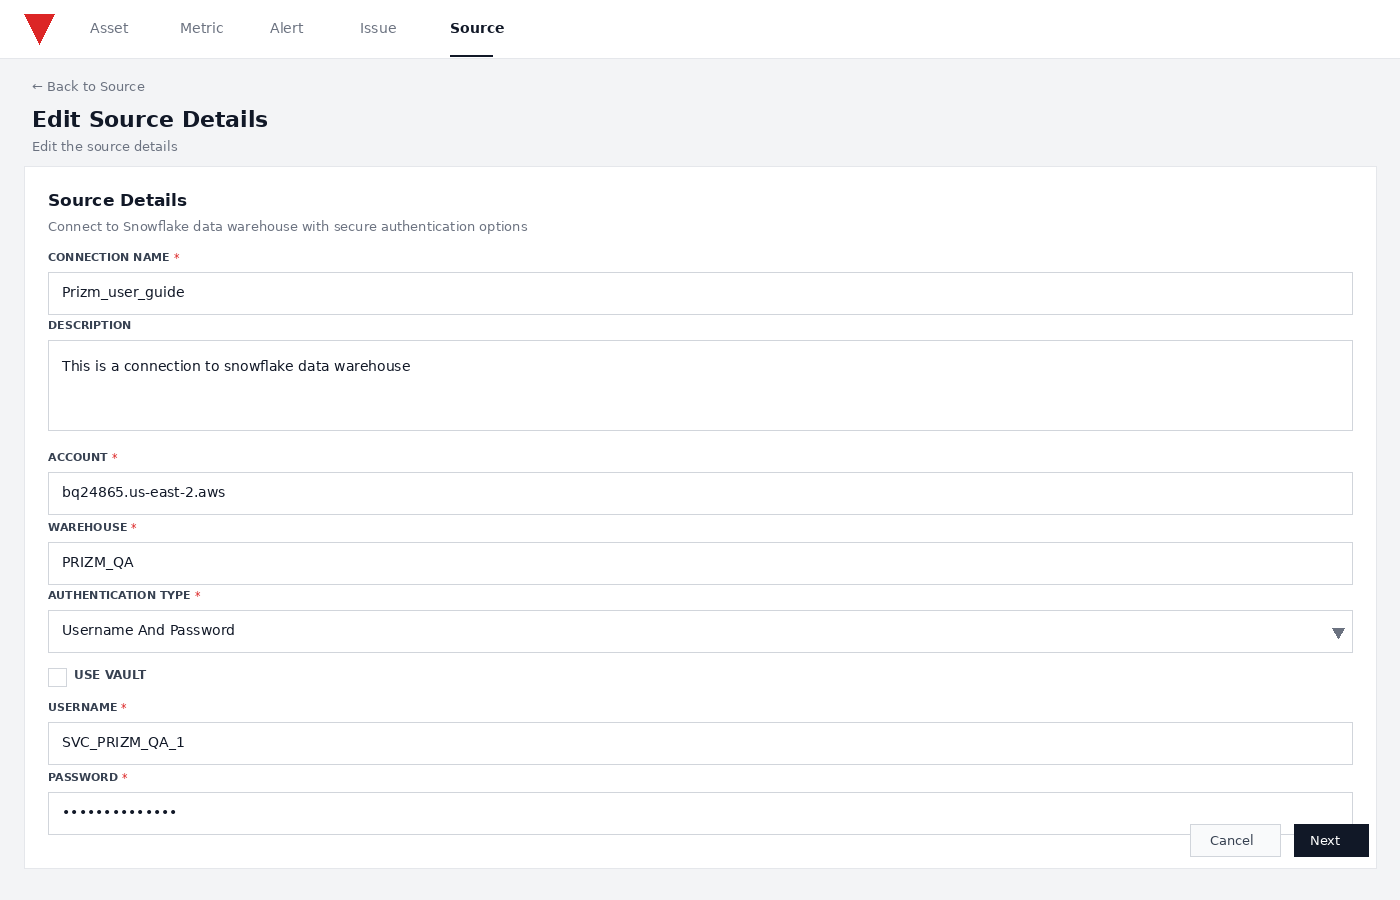
Navigate to **Sources** and click "**Add"**. Select **Snowflake** from the source type grid.
| **Field** | **Description** |
| ------------------ | -------------------------------------------------------- |
| Connection Name | A label for this instance (e.g., snowflake-prod) |
| Description | Details of the connection |
| Account Identifier | Your Snowflake account locator (e.g., xy12345.us-east-1) |
| Warehouse | The virtual warehouse Prizm will use to run queries |
Select your authentication type from the dropdown and provide the required credentials. Click **Next** to proceed.
 Key Pair authentication is recommended for production — it avoids password rotation issues and works with Snowflake IP-allowlist policies.
Select **Username And Password** from the Authentication Type dropdown, then fill in the following fields:
Key Pair authentication is recommended for production — it avoids password rotation issues and works with Snowflake IP-allowlist policies.
Select **Username And Password** from the Authentication Type dropdown, then fill in the following fields:
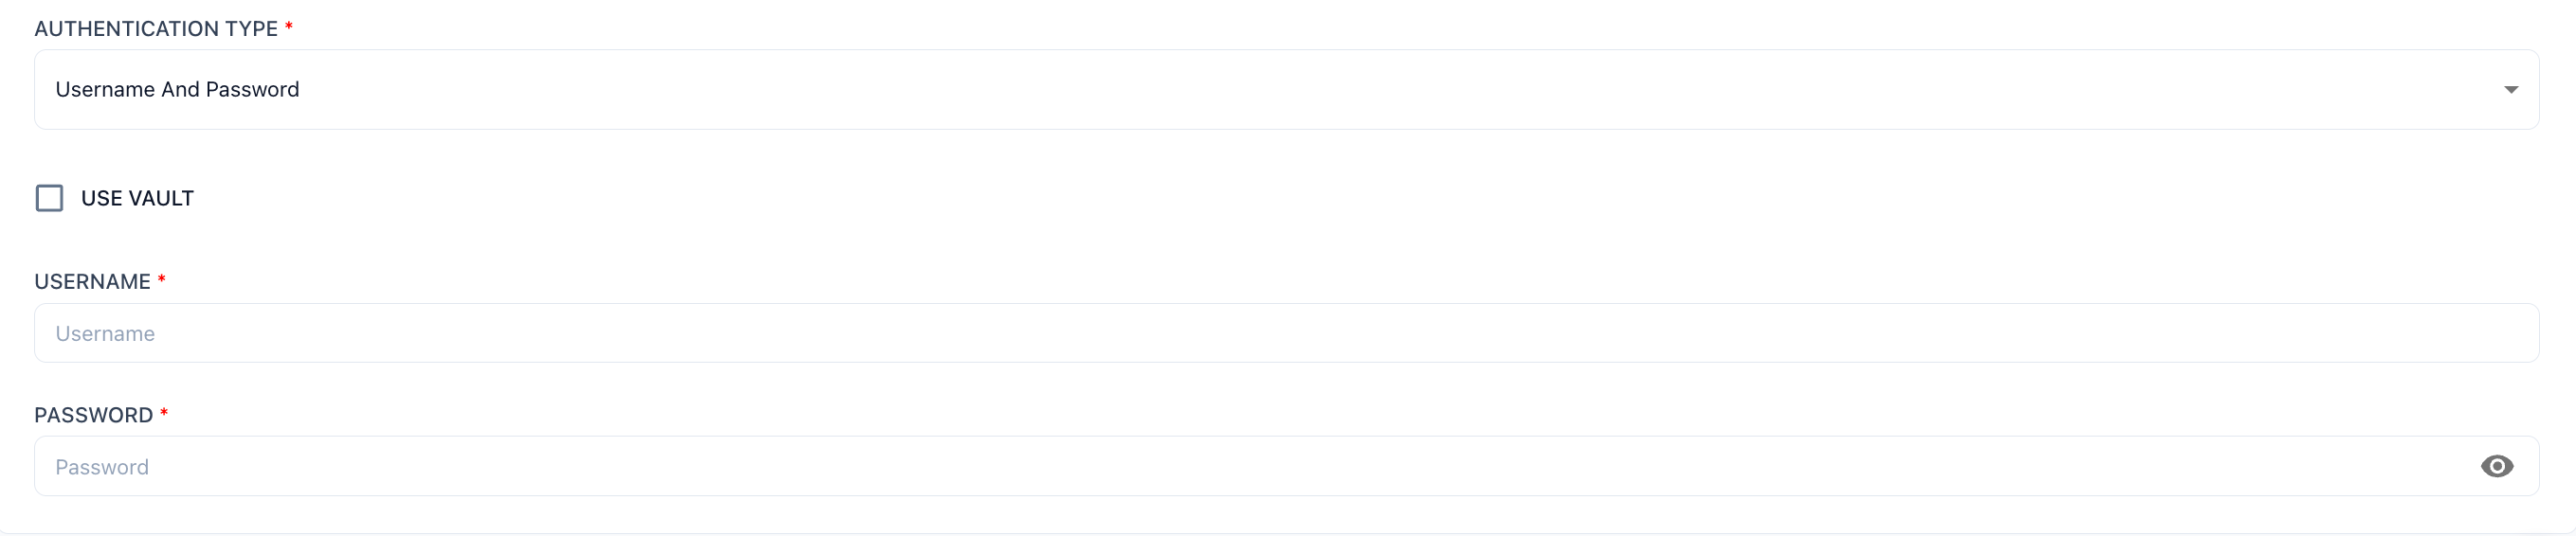 | **Field** | **Description** |
| --------- | ------------------------------------------------------------ |
| Username | The Snowflake service account username assigned `PRIZM_ROLE` |
| Password | The account password |
No additional Snowflake-side setup is required beyond the service account created in the Prerequisites step.
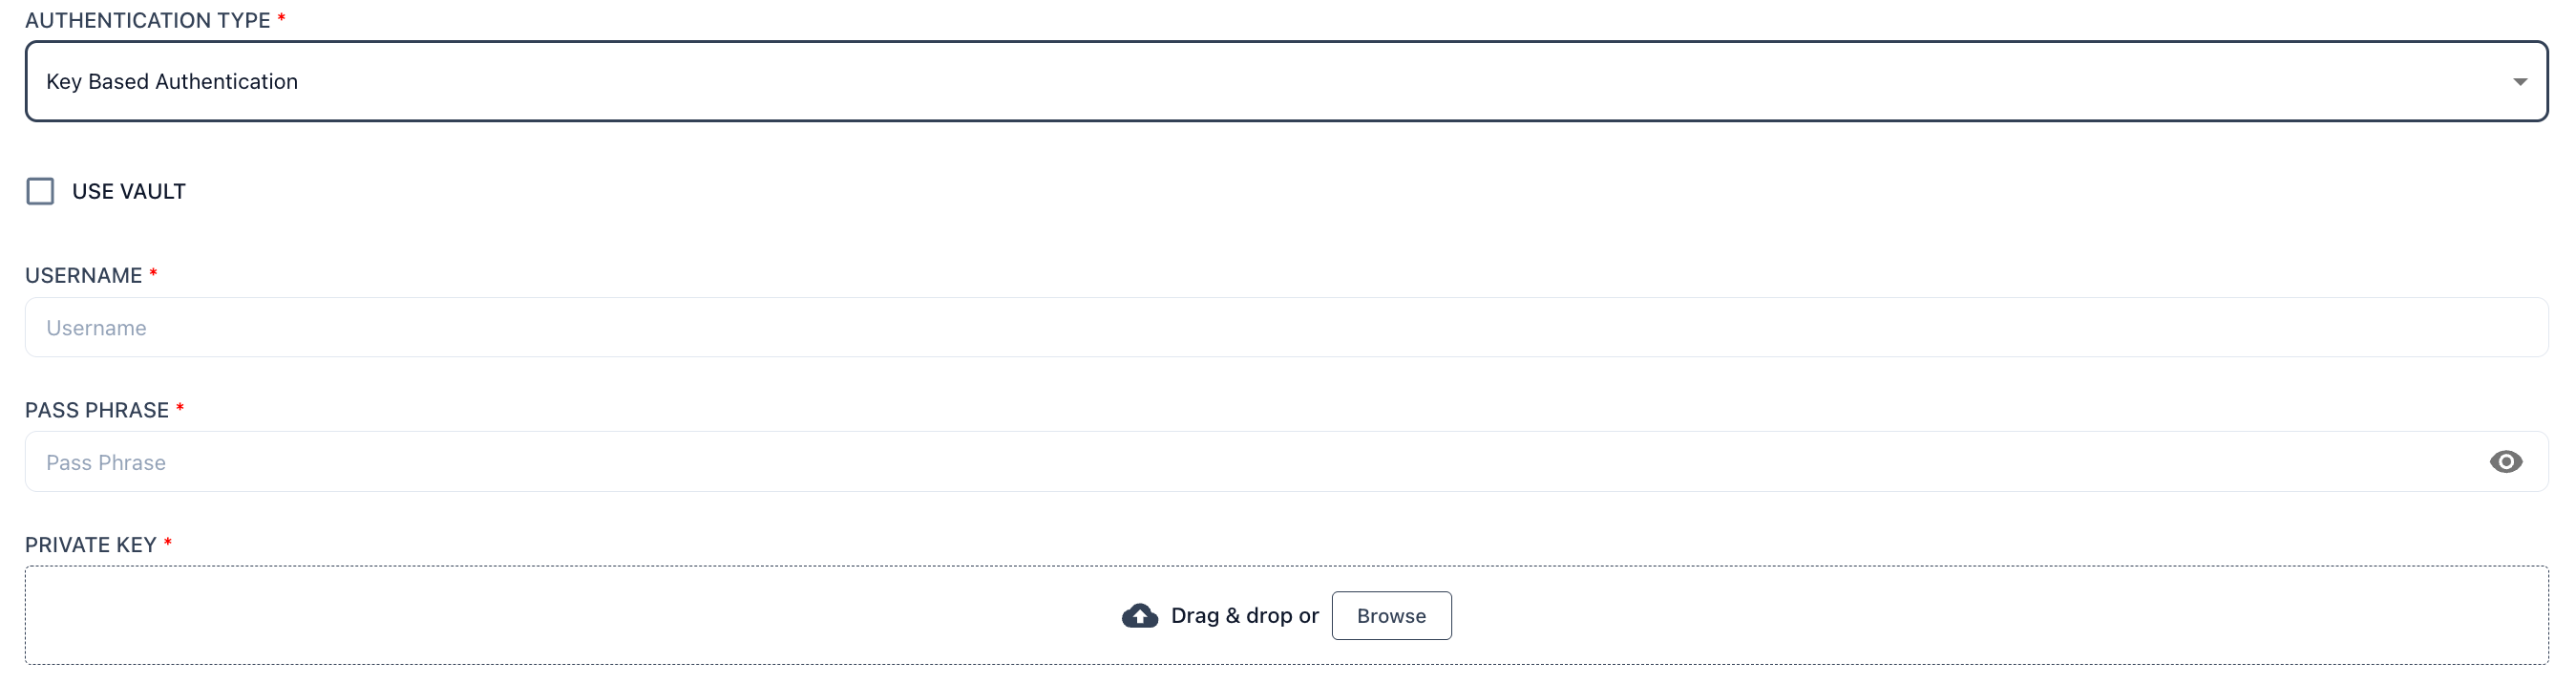
Select **Key Based Authentication** from the Authentication Type dropdown. Key pair authentication uses an RSA private key instead of a password.
| **Field** | **Description** |
| --------- | ------------------------------------------------------------ |
| Username | The Snowflake service account username assigned `PRIZM_ROLE` |
| Password | The account password |
No additional Snowflake-side setup is required beyond the service account created in the Prerequisites step.
Select **Key Based Authentication** from the Authentication Type dropdown. Key pair authentication uses an RSA private key instead of a password.
 **Snowflake-side setup — run these commands locally and in Snowflake:**
```bash theme={null}
# Generate a private key (no passphrase)
openssl genrsa 2048 | openssl pkcs8 -topk8 -inform PEM -out rsa_key.p8 -nocrypt
# Extract the public key
openssl rsa -in rsa_key.p8 -pubout -out rsa_key.pub
```
```sql theme={null}
-- Assign the public key to your Snowflake service account
ALTER USER SET RSA_PUBLIC_KEY='';
```
Then fill in the following fields in Prizm:
| **Field** | **Description** |
| ----------- | ---------------------------------------------------------------------------------------------- |
| Username | The Snowflake user the public key was assigned to |
| Pass Phrase | The passphrase used when generating the private key (leave blank if generated with `-nocrypt`) |
| Private Key | Upload the `.p8` private key file via drag & drop or Browse |
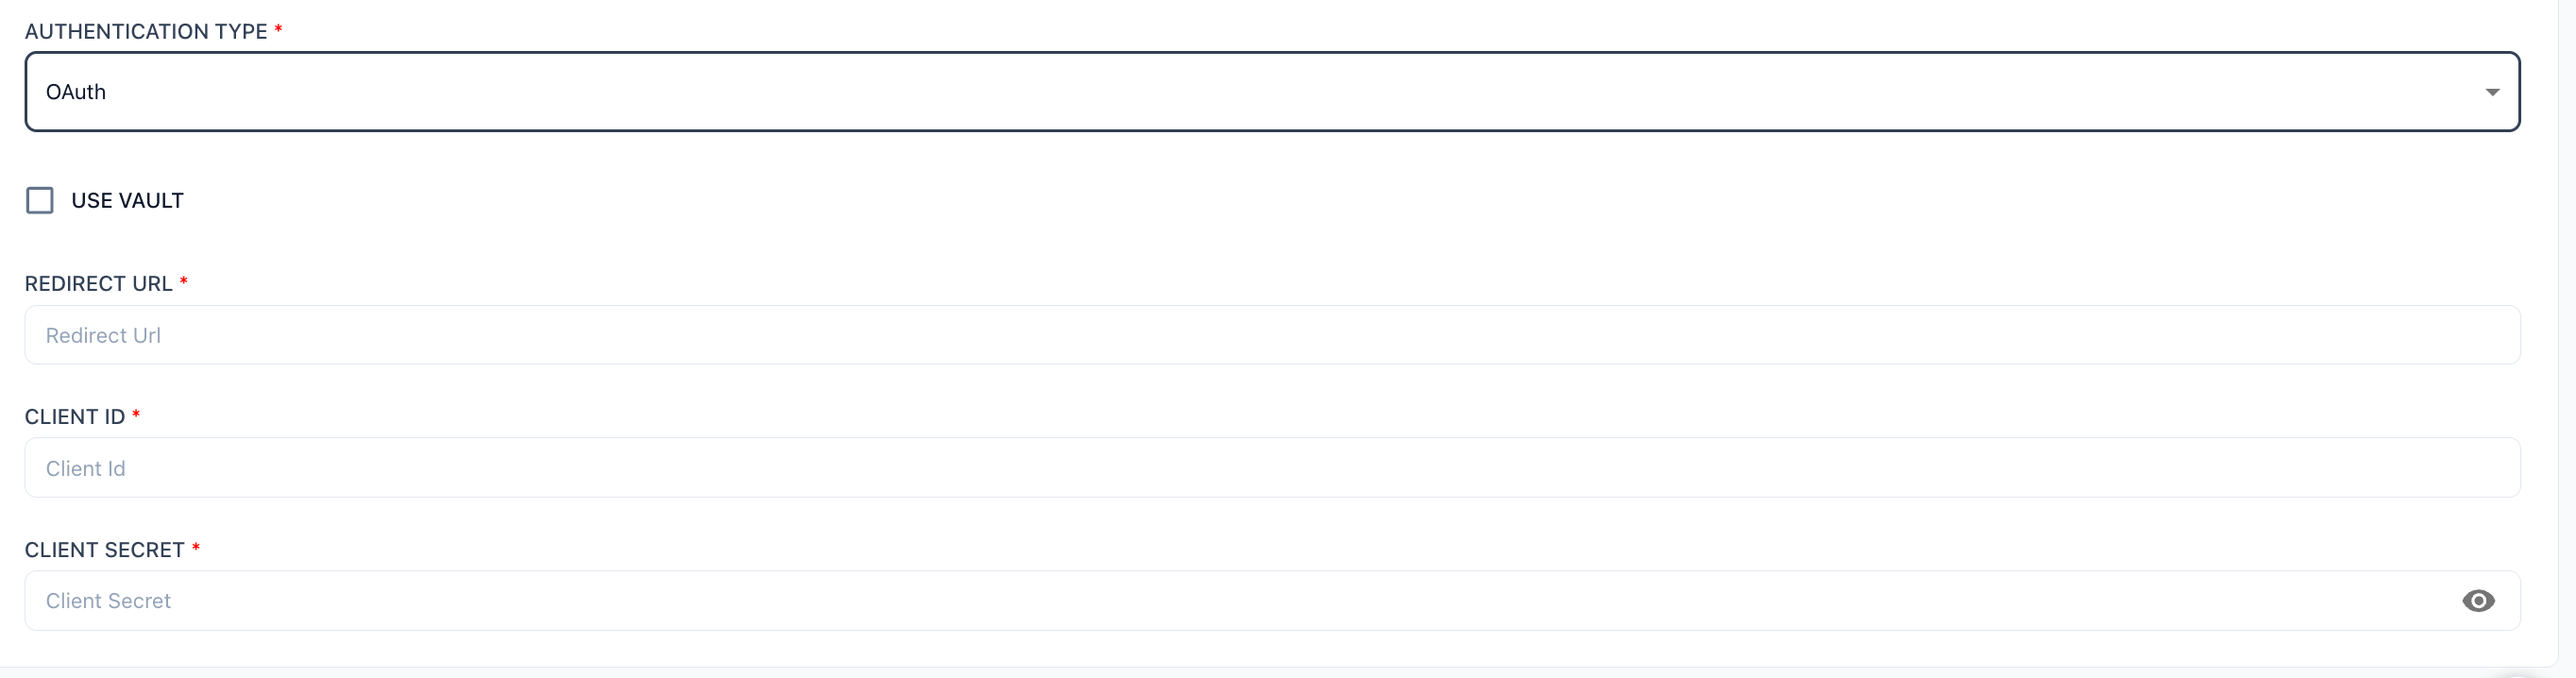
Select **OAuth** from the Authentication Type dropdown. Prizm acts as a confidential OAuth client against Snowflake's authorization server.
**Snowflake-side setup — run these commands locally and in Snowflake:**
```bash theme={null}
# Generate a private key (no passphrase)
openssl genrsa 2048 | openssl pkcs8 -topk8 -inform PEM -out rsa_key.p8 -nocrypt
# Extract the public key
openssl rsa -in rsa_key.p8 -pubout -out rsa_key.pub
```
```sql theme={null}
-- Assign the public key to your Snowflake service account
ALTER USER SET RSA_PUBLIC_KEY='';
```
Then fill in the following fields in Prizm:
| **Field** | **Description** |
| ----------- | ---------------------------------------------------------------------------------------------- |
| Username | The Snowflake user the public key was assigned to |
| Pass Phrase | The passphrase used when generating the private key (leave blank if generated with `-nocrypt`) |
| Private Key | Upload the `.p8` private key file via drag & drop or Browse |
Select **OAuth** from the Authentication Type dropdown. Prizm acts as a confidential OAuth client against Snowflake's authorization server.
 **Snowflake-side setup — create a security integration:**
```sql theme={null}
CREATE SECURITY INTEGRATION prizm_oauth
TYPE = OAUTH
ENABLED = TRUE
OAUTH_CLIENT = CUSTOM
OAUTH_CLIENT_TYPE = 'CONFIDENTIAL'
OAUTH_REDIRECT_URI = ''
OAUTH_ISSUE_REFRESH_TOKENS = TRUE
OAUTH_REFRESH_TOKEN_VALIDITY = 7776000;
-- Retrieve the Client ID and Client Secret
SELECT SYSTEM$SHOW_OAUTH_CLIENT_SECRETS('PRIZM_OAUTH');
```
Then fill in the following fields in Prizm:
| **Field** | **Description** |
| ------------- | ------------------------------------------------------------------------------------------------- |
| Redirect URL | Copy from the Prizm connection form and use as `OAUTH_REDIRECT_URI` when creating the integration |
| Client ID | The OAuth client ID returned by `SYSTEM$SHOW_OAUTH_CLIENT_SECRETS` |
| Client Secret | The OAuth client secret returned by `SYSTEM$SHOW_OAUTH_CLIENT_SECRETS` |
The redirect URL is auto-generated by the Prizm portal at source setup time. Its format is `{portal_origin}/source/{connector_type}/callback` — for example, `https://your-prizm-domain.com/source/snowflake/callback`. This exact URL must be registered in the Snowflake OAuth security integration as an allowed redirect URI before completing the connection.
Once a valid authentication details are provided, the user will be taken to the asset selection page, use Include and Exclude wildcard patterns to control which objects are onboarded.
| **Level** | **Example Patterns** |
| ---------- | ---------------------------------------------------------------- |
| Database | Include: ANALYTICS\_DB, PROD\_DB — Exclude: DEV\_\*, SANDBOX\_\* |
| Schema | Include: PUBLIC, REPORTING — Exclude: TEMP\_\*, \_INTERNAL |
| Table/View | Select the required table/view from the drop dowm |
**Snowflake-side setup — create a security integration:**
```sql theme={null}
CREATE SECURITY INTEGRATION prizm_oauth
TYPE = OAUTH
ENABLED = TRUE
OAUTH_CLIENT = CUSTOM
OAUTH_CLIENT_TYPE = 'CONFIDENTIAL'
OAUTH_REDIRECT_URI = ''
OAUTH_ISSUE_REFRESH_TOKENS = TRUE
OAUTH_REFRESH_TOKEN_VALIDITY = 7776000;
-- Retrieve the Client ID and Client Secret
SELECT SYSTEM$SHOW_OAUTH_CLIENT_SECRETS('PRIZM_OAUTH');
```
Then fill in the following fields in Prizm:
| **Field** | **Description** |
| ------------- | ------------------------------------------------------------------------------------------------- |
| Redirect URL | Copy from the Prizm connection form and use as `OAUTH_REDIRECT_URI` when creating the integration |
| Client ID | The OAuth client ID returned by `SYSTEM$SHOW_OAUTH_CLIENT_SECRETS` |
| Client Secret | The OAuth client secret returned by `SYSTEM$SHOW_OAUTH_CLIENT_SECRETS` |
The redirect URL is auto-generated by the Prizm portal at source setup time. Its format is `{portal_origin}/source/{connector_type}/callback` — for example, `https://your-prizm-domain.com/source/snowflake/callback`. This exact URL must be registered in the Snowflake OAuth security integration as an allowed redirect URI before completing the connection.
Once a valid authentication details are provided, the user will be taken to the asset selection page, use Include and Exclude wildcard patterns to control which objects are onboarded.
| **Level** | **Example Patterns** |
| ---------- | ---------------------------------------------------------------- |
| Database | Include: ANALYTICS\_DB, PROD\_DB — Exclude: DEV\_\*, SANDBOX\_\* |
| Schema | Include: PUBLIC, REPORTING — Exclude: TEMP\_\*, \_INTERNAL |
| Table/View | Select the required table/view from the drop dowm |
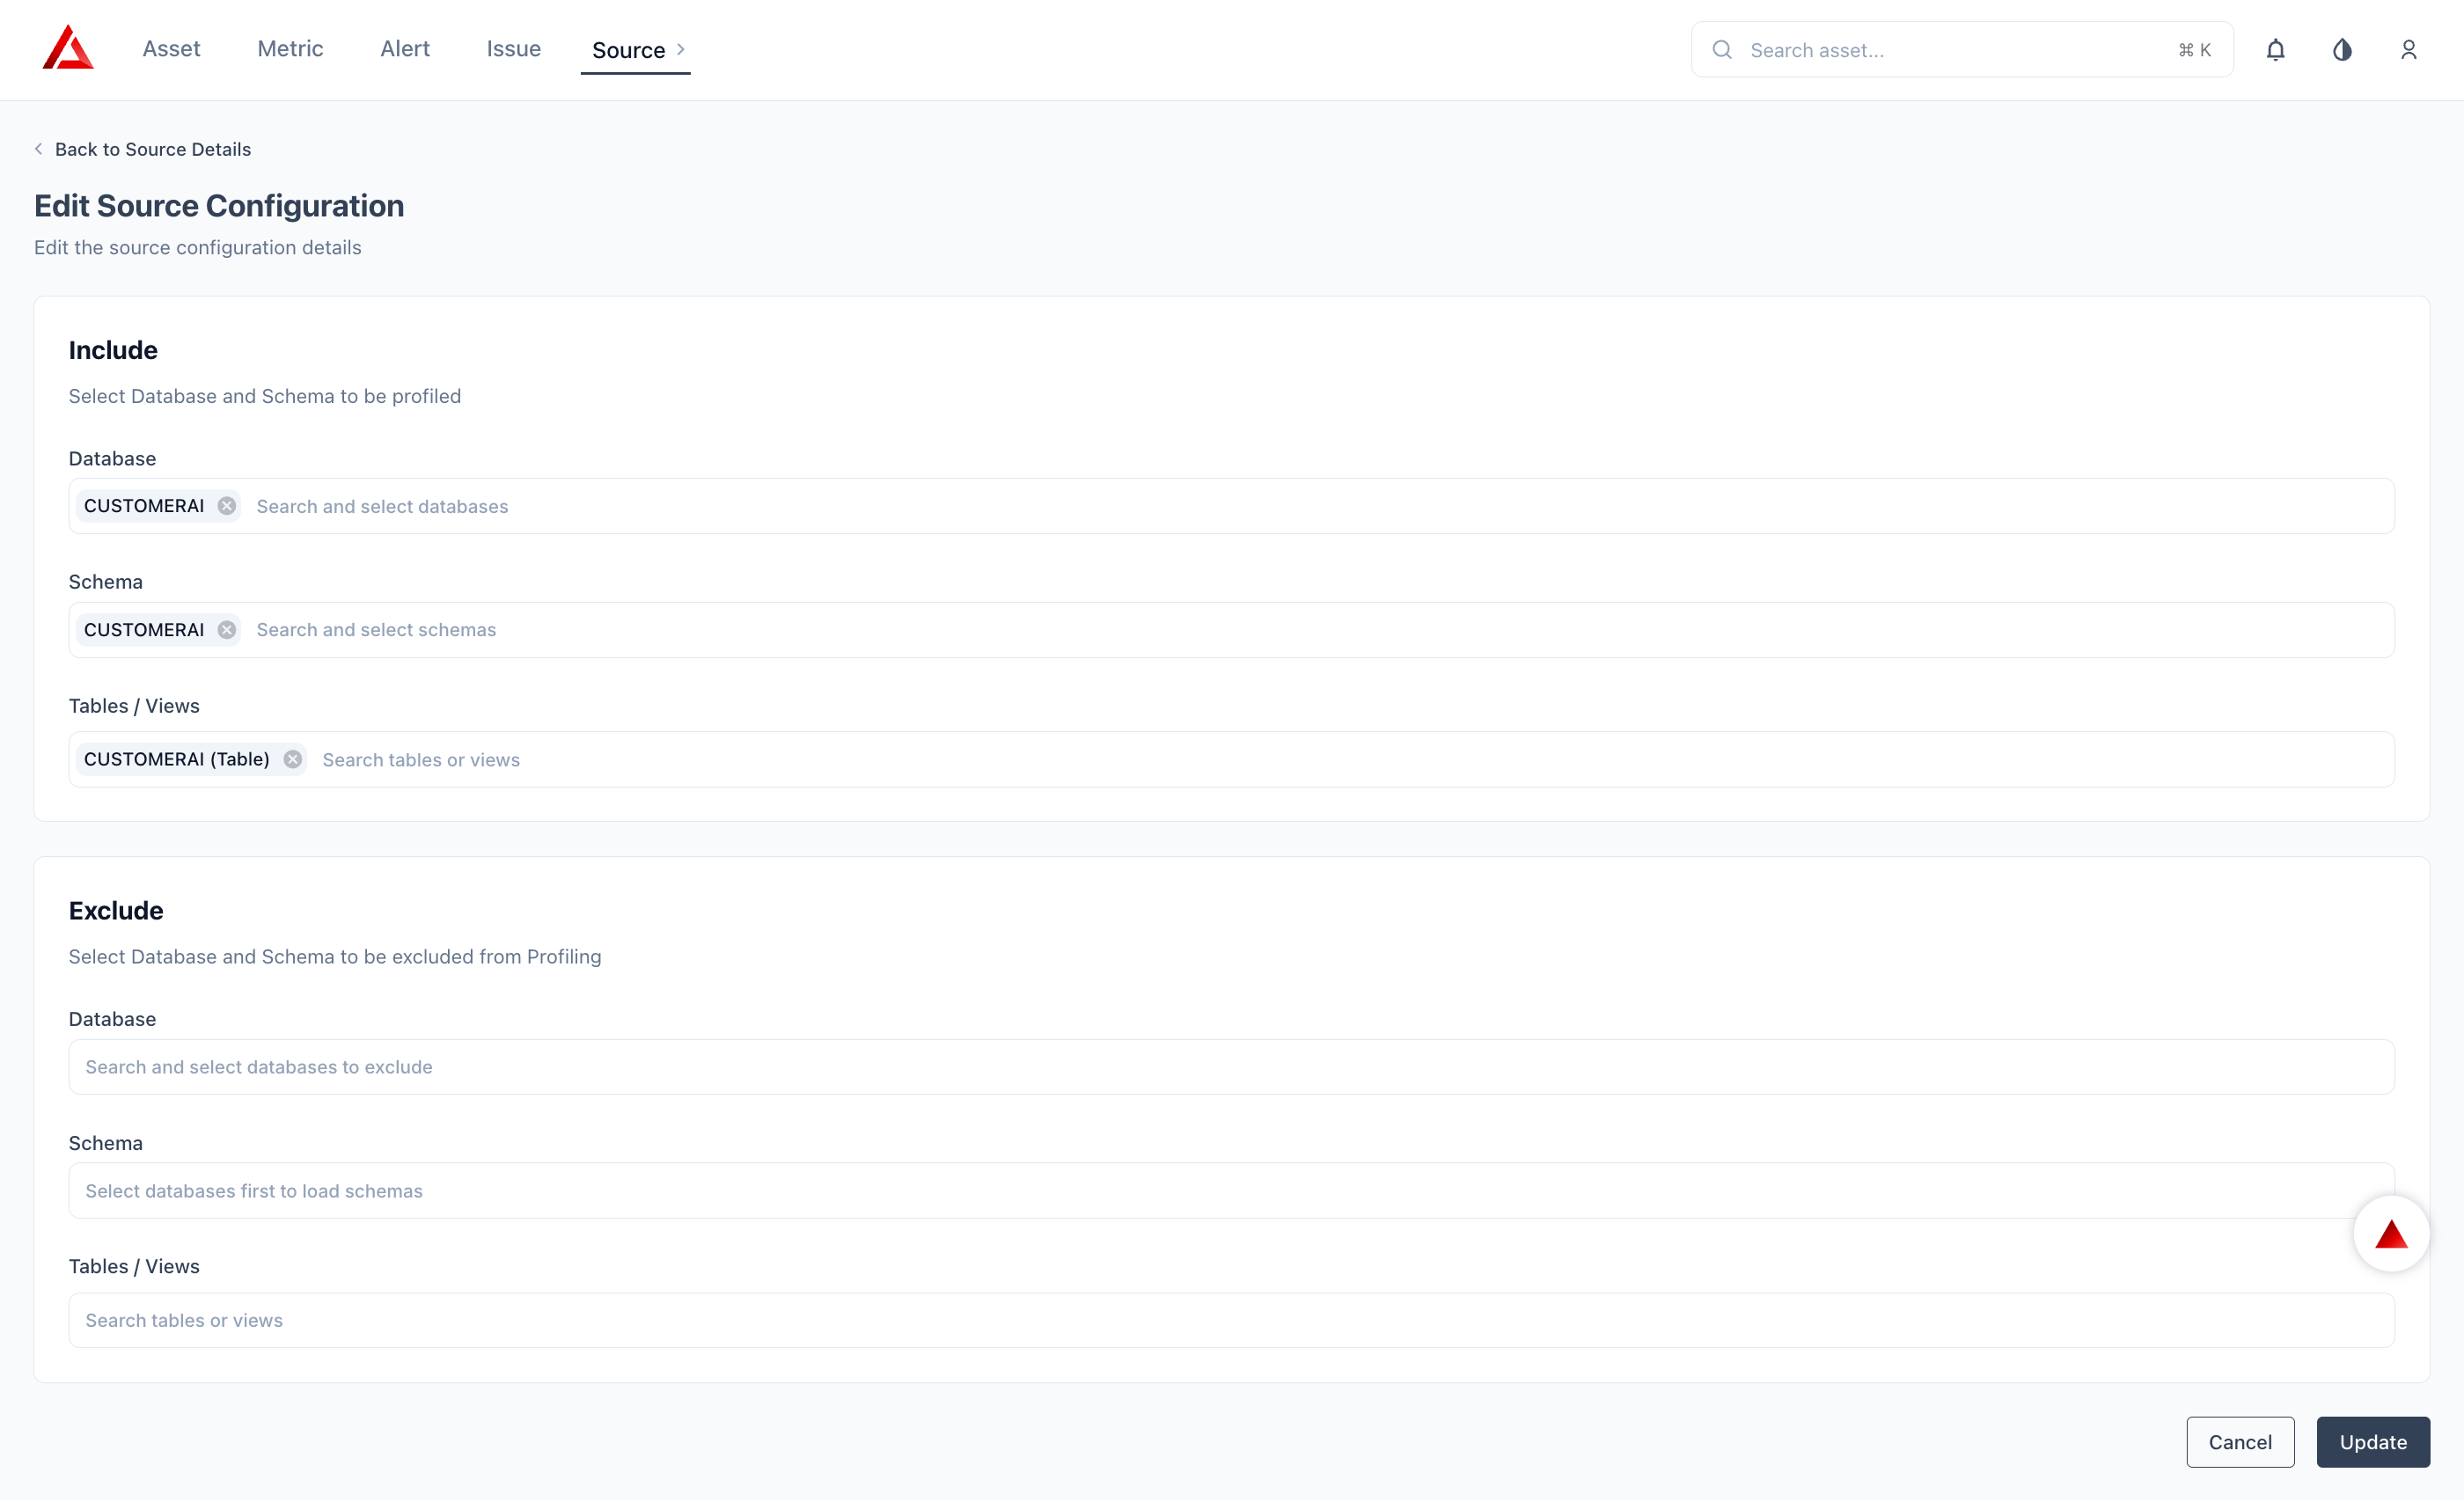 Exclude rules take precedence over include rules when both match the same object.
| **Job Type** | **Default** | **What It Does** |
| ------------ | --------------------------- | ------------------------------------------------------------------- |
| Technical | Daily | Databases, warehouses, schemas, tables, views, columns |
| Operational | Hourly | Volume, freshness, schema change, anomaly detection |
| Governance | Parallel, after Operational | Tags and business metadata sync |
| Performance | Daily | Query stats, warehouse compute, storage cost |
| Lineage | No schedule | Table- and column-level lineage — triggered manually per asset only |
Older Prizm documentation and some support runbooks refer to these same jobs as **Catalog**, **Observability**, and **Pipeline**. If you're following an older guide: Catalog = Technical, Observability = Operational, and Pipeline observability is covered by Governance/Performance depending on the signal. See [Scheduling](/architecture/scheduling) for the full current job list.
You can override each schedule individually from the connector detail page after saving. Schedules for metadata synchronization jobs (technical, operational, governance, performance, usage summary, compute metric) are created automatically once a source is configured. Custom metric schedules can be created manually.
**How schedule overrides work:** Any updated schedule overrides the existing one and applies to subsequent job executions. If a job is triggered manually, it runs immediately without affecting the configured schedule. Schedule changes take effect after they are saved, and all future executions follow the updated schedule.
**Manual re-sync:** The platform supports both manual and scheduled refresh/re-sync operations. Triggering a manual scan runs the job immediately without disrupting the configured schedule.
Hourly is the only cadence Prizm documents support for. A 5-minute schedule was observed in testing to actually collect roughly every 30 minutes rather than every 5 — there's no published minimum interval for sub-hourly values yet, so don't rely on a sub-hourly schedule running exactly as configured.
Click **Update** to save the connection details. Prizm runs an initial full scan immediately — assets appear in the catalog within a few minutes. Navigate to **Settings → Connectors → Logs** to monitor scan progress.
## Concurrency & Performance Impact
Prizm controls workload concurrency at the job orchestration layer, not via a per-customer Snowflake connection pool limit. Higher concurrency settings increase the number of parallel queries against the configured warehouse. Invalid or inactive sources are excluded from scheduling, which reduces unnecessary load.
| **Setting** | **Default** | **Impact** |
| -------------------------------------- | ---------------------------------------------- | ------------------------------------------------------ |
| Global concurrent jobs | 20 (overridable via `MAX_JOBS` env) | Caps how many Prizm jobs run in parallel platform-wide |
| Snowflake technical metadata | Batch concurrency 8 | Parallel metadata queries against Snowflake |
| Lineage extraction | Batch size 100, concurrency 8 | Parallel `GET_LINEAGE` calls |
| Compute metric / lookup / quality jobs | Per-job-type limits from platform `job_config` | Controls parallel Snowflake MCP/agent calls |
## Next Steps
See the full field-level breakdown of every metadata object Prizm extracts.
Common questions about credentials, scoping, and permissions.
Diagnose connection failures, permission errors, and timeouts.
Exclude rules take precedence over include rules when both match the same object.
| **Job Type** | **Default** | **What It Does** |
| ------------ | --------------------------- | ------------------------------------------------------------------- |
| Technical | Daily | Databases, warehouses, schemas, tables, views, columns |
| Operational | Hourly | Volume, freshness, schema change, anomaly detection |
| Governance | Parallel, after Operational | Tags and business metadata sync |
| Performance | Daily | Query stats, warehouse compute, storage cost |
| Lineage | No schedule | Table- and column-level lineage — triggered manually per asset only |
Older Prizm documentation and some support runbooks refer to these same jobs as **Catalog**, **Observability**, and **Pipeline**. If you're following an older guide: Catalog = Technical, Observability = Operational, and Pipeline observability is covered by Governance/Performance depending on the signal. See [Scheduling](/architecture/scheduling) for the full current job list.
You can override each schedule individually from the connector detail page after saving. Schedules for metadata synchronization jobs (technical, operational, governance, performance, usage summary, compute metric) are created automatically once a source is configured. Custom metric schedules can be created manually.
**How schedule overrides work:** Any updated schedule overrides the existing one and applies to subsequent job executions. If a job is triggered manually, it runs immediately without affecting the configured schedule. Schedule changes take effect after they are saved, and all future executions follow the updated schedule.
**Manual re-sync:** The platform supports both manual and scheduled refresh/re-sync operations. Triggering a manual scan runs the job immediately without disrupting the configured schedule.
Hourly is the only cadence Prizm documents support for. A 5-minute schedule was observed in testing to actually collect roughly every 30 minutes rather than every 5 — there's no published minimum interval for sub-hourly values yet, so don't rely on a sub-hourly schedule running exactly as configured.
Click **Update** to save the connection details. Prizm runs an initial full scan immediately — assets appear in the catalog within a few minutes. Navigate to **Settings → Connectors → Logs** to monitor scan progress.
## Concurrency & Performance Impact
Prizm controls workload concurrency at the job orchestration layer, not via a per-customer Snowflake connection pool limit. Higher concurrency settings increase the number of parallel queries against the configured warehouse. Invalid or inactive sources are excluded from scheduling, which reduces unnecessary load.
| **Setting** | **Default** | **Impact** |
| -------------------------------------- | ---------------------------------------------- | ------------------------------------------------------ |
| Global concurrent jobs | 20 (overridable via `MAX_JOBS` env) | Caps how many Prizm jobs run in parallel platform-wide |
| Snowflake technical metadata | Batch concurrency 8 | Parallel metadata queries against Snowflake |
| Lineage extraction | Batch size 100, concurrency 8 | Parallel `GET_LINEAGE` calls |
| Compute metric / lookup / quality jobs | Per-job-type limits from platform `job_config` | Controls parallel Snowflake MCP/agent calls |
## Next Steps
See the full field-level breakdown of every metadata object Prizm extracts.
Common questions about credentials, scoping, and permissions.
Diagnose connection failures, permission errors, and timeouts.