
Overview
The Security section in Settings manages identity and access for your Prizm organization. Navigate to Settings → Security to access this section.- SAML/SSO
- Access
The SAML/SSO tab configures single sign-on (SSO) using SAML 2.0 and automated user provisioning via SCIM.
Click Update Configuration to save changes.
SSO Provider Configuration
| Field | Description |
|---|---|
| Enabled | Toggle to enable or disable SSO for the organization. |
| Select SSO Provider | The identity provider to use. Currently supports Azure Active Directory. |
| Entity ID | The unique identifier for your Prizm service provider, provided to your IdP. |
| Sign In URL | The IdP’s SAML sign-in endpoint URL. |
| ACS URL | Assertion Consumer Service URL — the Prizm endpoint that receives SAML assertions from the IdP. |
| SCIM URL | The Prizm SCIM endpoint for automated user provisioning and deprovisioning. |
| Federation File | Upload the XML federation metadata file from your IdP (max 5 MB). |
SCIM automates user provisioning — members added or removed in your identity provider are automatically reflected in Prizm. Users provisioned via SCIM appear with SCIM as their Created Source in the Member list.
The Access tab manages all organization-level access controls — who has access, what they can do, and how they are organized. It is divided into four sub-sections: Member, Group, Role, and Permission Set.
- Member
- Group
- Role
- Permission Set
The Member section lists all users in your Prizm organization. From here you can invite new members, edit user details inline, view audit and activity logs per user, and remove members.
Custom roles defined in the Role tab also appear in the role dropdown when assigning a role to a member.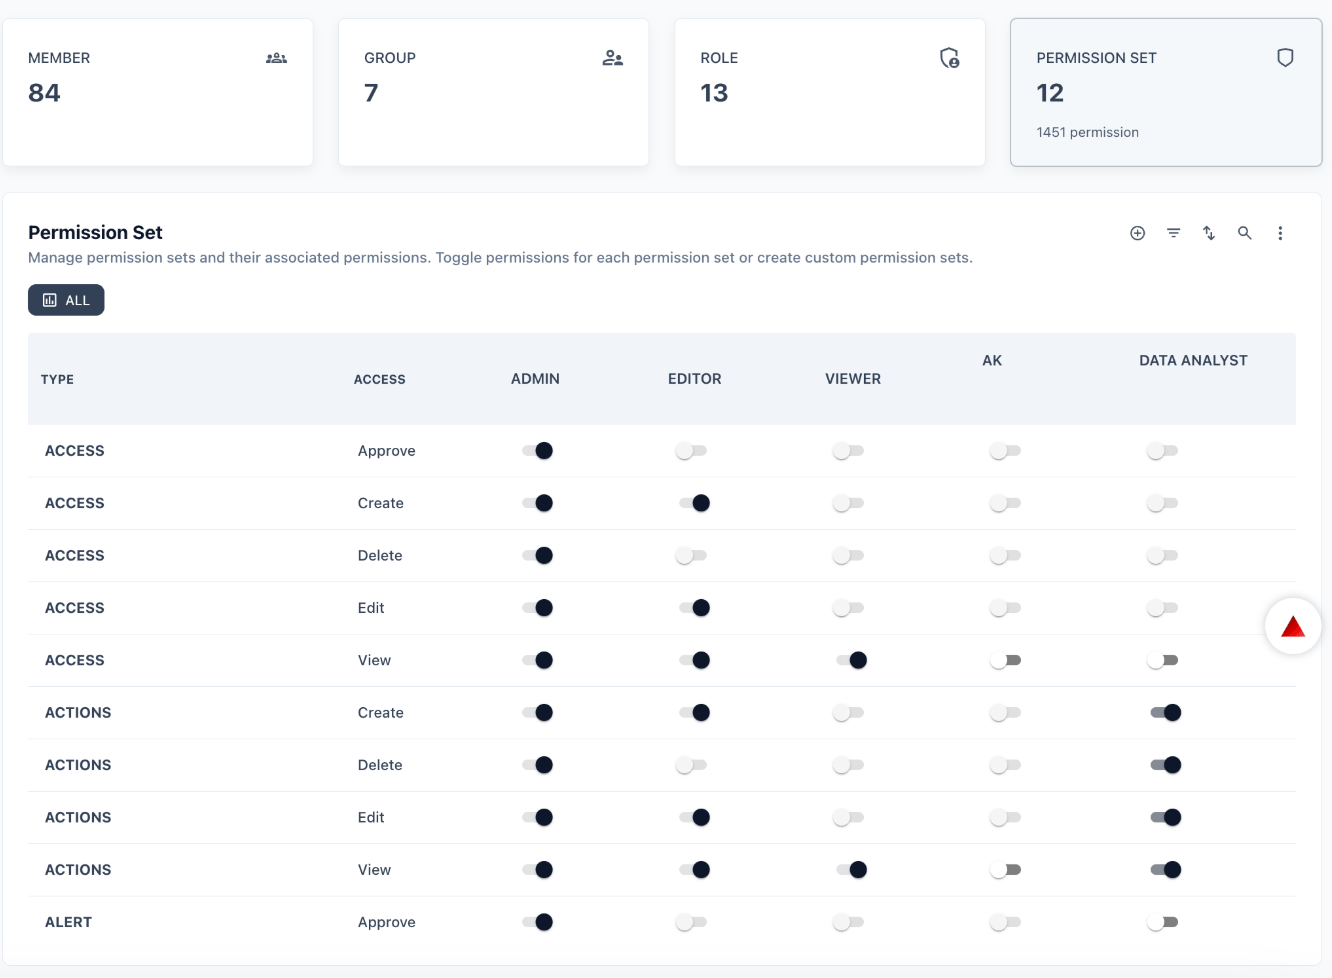
Member table
| Column | Description |
|---|---|
| The user’s email address. Primary identifier — not editable after invite. | |
| First Name | User’s first name. Click to edit inline. |
| Last Name | User’s last name. Click to edit inline. |
| Role | The role assigned to this user. Click the dropdown to change the role inline without opening a separate form. |
| Status | Checkbox — checked means the account is active. Uncheck to deactivate the user without deleting them. |
| MFA | Checkbox indicating whether multi-factor authentication is enabled for this user. |
| SSO | Checkbox indicating whether the user authenticates via SSO. |
| Created Source | How the user was added — MANUAL (invited directly in Prizm) or SCIM (provisioned automatically via your identity provider). |
| Action | Per-row actions: Audit Log, Activity Log, Delete. |
Adding a member
Click the Add button at the top of the Member section to invite a new user to your organization. Enter the user’s email address and assign an initial role. An invitation is sent to the email address. The user appears in the Member list with MANUAL as the Created Source once they accept.Users provisioned through SCIM are added automatically when a user is assigned to the Prizm application in your identity provider. You do not need to invite them manually — they appear in the Member list with SCIM as the Created Source.
Editing a member
All editable fields support inline editing directly in the table:- First Name / Last Name — click the cell to edit and press Enter or click away to save.
- Role — click the Role cell to open a dropdown and select a new role. The change takes effect immediately.
- Status — toggle the checkbox to activate or deactivate the account.
Member actions
Each row has three action buttons in the Action column:| Action | Description |
|---|---|
| Audit Log | Opens a log of all configuration and permission changes made to or by this member — role changes, group assignments, setting updates. |
| Activity Log | Opens a log of this member’s activity in Prizm — assets viewed, metrics run, issues created or resolved. |
| Delete | Permanently removes the member from the organization. This action cannot be undone. |
Built-in roles
| Role | Description |
|---|---|
| Owner | Full administrative access to all settings and data. |
| Manager | Can manage users, groups, and most configuration. |
| Steward | Data stewardship access — can review, approve, and act on data quality issues. |
| User | Standard read and interact access. |
Groups organize members for easier permission management and notification routing. Assigning a role to a group applies that role’s permissions to all members of the group. From here you can create groups, add or remove members per group, and manage group roles and status.
Group table
| Column | Description |
|---|---|
| Name | Group name. Click to edit inline. |
| Description | Optional description of the group’s purpose. Click to edit inline. |
| Role | The role assigned to the group — applies to all members. Click the dropdown to change inline. |
| Users | Members in the group, shown as avatar icons with a count. Each user has a Remove button. An Add USERS button appears inline to add members to the group. |
| Status | Checkbox — checked means the group is active. |
| Action | Delete to remove the group. |
Creating a group
Click the Add button to create a new group. Enter a name, optional description, and assign a role. After saving, the group appears in the table and you can add members directly from the Users column.Managing group members
Members are managed directly in the Users column — no separate form is needed:- Add users — click Add USERS in the Users cell of the group row. Search for and select members to add. Members can belong to multiple groups.
- Remove a user — hover over a user’s avatar in the Users cell and click the Remove button that appears next to their avatar.
Editing a group
All editable fields support inline editing:- Name / Description — click the cell to edit inline and press Enter or click away to save.
- Role — click the Role cell dropdown to change the group role. All group members inherit the new role.
- Status — toggle the Status checkbox to activate or deactivate the group.
Deleting a group
Click Delete in the Action column. This removes the group and its role assignments but does not remove the member accounts themselves.Roles are named permission bundles assigned to members or groups. Prizm includes built-in roles covering standard access levels. Custom roles can be created to define precisely scoped access tailored to your organization’s structure.
Role table
| Column | Description |
|---|---|
| Name | Role name. |
| Description | Description of what the role permits. |
| Action | Edit for all roles. Delete for custom roles only — built-in roles cannot be deleted. |
Built-in roles
Prizm includes the following roles that cannot be deleted. They can be edited to update their description or permission set assignments.| Role | Access level |
|---|---|
| Owner | Full administrative access to all platform settings and data. |
| Steward | Data stewardship access — review, approve, and act on data quality issues. |
| User | Standard read and interact access. |
Custom roles
Click the Add button to create a custom role. Provide a name and description, then assign one or more permission sets to define exactly what the role can see and do. Custom roles appear alongside built-in roles in the member and group role dropdowns.To edit a custom role, click Edit in the Action column. Update the name, description, or permission set assignments and save. To delete a custom role, click Delete — members and groups currently assigned this role will need to be reassigned.Built-in roles (Owner, Steward, User) can be edited but not deleted. Custom roles support both Edit and Delete.
Permission Sets define the granular permissions available to roles — controlling exactly what actions each role can perform across every resource in Prizm. Prizm ships with 12 built-in permission sets covering 1,451 configurable permissions.
Permission matrix
The Permission Set view is a matrix where:- Rows are individual resource/action pairs (e.g., ASSET → Create, METRIC AND QUERIES → Approve)
- Columns are the permission sets
- Each cell is a toggle checkbox — checked means the permission is granted for that set, unchecked means it is denied
Built-in permission sets
| Permission Set | Description |
|---|---|
| ACCESS | Access management permissions — controls who can manage members, groups, and roles. |
| ADMIN | Full administrative permissions across all platform resources. |
| EDITOR | Create and edit permissions across data assets, metrics, and issues. |
| VIEWER | Read-only view permissions across data assets, metrics, and issues. |
| DATA ANALYST | Permissions scoped for data analysis — view and interact with metrics, assets, and reports. |
| END USER | Minimal permissions for general users — view access with limited interaction. |
| DATA ENG | Permissions for data engineering workflows — includes metric and pipeline management. |
| TEAM MEMBER | General team permissions — view and collaborate on issues and assets. |
| TEST | Test permission set for validating permission configurations. |
| DATA STEWARD | Stewardship-focused permissions — approve, edit, and manage data quality issues. |
| DEV | Developer-level permissions — includes access to configuration, integrations, and platform utilities. |
Permission categories
Permissions are organized by resource category. Each category includes a subset of the following actions: Approve, Create, Delete, Edit, View.| Resource category | Available actions |
|---|---|
| ACCESS | Approve, Create, Delete, Edit, View |
| ACTIONS | Create, Delete, Edit, View |
| ALERT | Approve, Create, Delete, Edit, View |
| ANALYTICS | Approve, Create, Delete, Edit, View |
| APPLICATION | Approve, Create, Delete, Edit, View |
| ASSET | Approve, Create, Delete, Edit, Preview, View |
| COMMAND CENTER – JOBS | View |
| COMMAND CENTER – LOGS | View |
| COMMAND CENTER – SCHEDULE | Approve, Edit, View |
| COMMAND CENTER – UTILITY EXPORT | View |
| COMMAND CENTER – UTILITY IMPORT | View |
| DIMENSION | Create, Delete, Edit, View |
| DOMAIN | Approve, Create, Delete, Edit, View |
| EXCEPTION | Edit, View |
| FIELD | Create, Delete, Edit, View |
| ISSUE | Approve, Create, Delete, Edit, View |
| METRIC AND QUERIES | Approve, Create, Delete, Edit, Exception, View |
Creating a custom permission set
Click the Add button to create a new permission set. Give it a name, then use the permission matrix to toggle on the specific resource/action permissions this set should grant. Assign the new permission set to a role in the Role tab to make it active.Permission sets are assigned to roles, not directly to users. To apply a permission set, assign it to a role and then assign that role to the relevant members or groups.
Use the TYPE column filter at the top of the matrix to filter permissions by category, making it easier to configure a focused permission set without scrolling through all 1,451 entries.