
Connecting Alation to Prizm
Setting up the Alation integration involves three steps: authenticating to your Alation instance, selecting the target datasource, and configuring what Prizm pushes to Alation and pulls from it. Optionally, you can configure a sync schedule to automate catalog updates.Prerequisites
- An Alation instance URL
- An Alation account with write access to catalog pages on the target datasource (service account recommended)
- The exact name of the Alation datasource that corresponds to the data source Prizm monitors
- Admin or privileged user access in Prizm to configure integrations
- Alation admin access to configure Feature Config settings and Customize Catalog (one-time setup)
Step 1: Prepare your Alation instance
Before connecting Prizm, an Alation administrator must complete two configuration steps in Alation. These are one-time changes that enable the Health tab and the custom field section Prizm writes to.Enable Data Health features
In Alation, navigate to Admin Settings → Feature Config and enable both of the following settings: Enable Data Health — displays the Health tab on catalog pages, populated via the public data health API. This is required for Prizm to export data quality checks into the Health tab. Enable Data Health 2022.4 Features — enables beta Data Health features. When enabled, OCF-ingested objects that are removed from the catalog produce Deleted data health values. Alert and Warning values propagate to downstream nodes in the lineage graph. The Health tab also becomes available on BIReport and BIDataSource catalog pages.Create the Prizm custom field
Prizm writes quality metrics to Alation using a dedicated Rich Text custom field in Alation. This field must be created and added to table and column templates before the integration will populate correctly.1
Create the custom field
In Alation, navigate to Customize Catalog → Custom Fields tab. Under the Rich Texts section, click + to create a new Rich Text field. Name it PRIZM.
2
Add the field to table and column templates
Navigate to Customize Catalog → Customize Templates tab. For both the Table template and the Column template, add the PRIZM field to the template layout. This makes the field visible on all table and column catalog pages.
These Alation-side steps require Alation admin privileges. They only need to be completed once per Alation instance, regardless of how many datasources are connected to Prizm.
Step 2: Open Integration settings
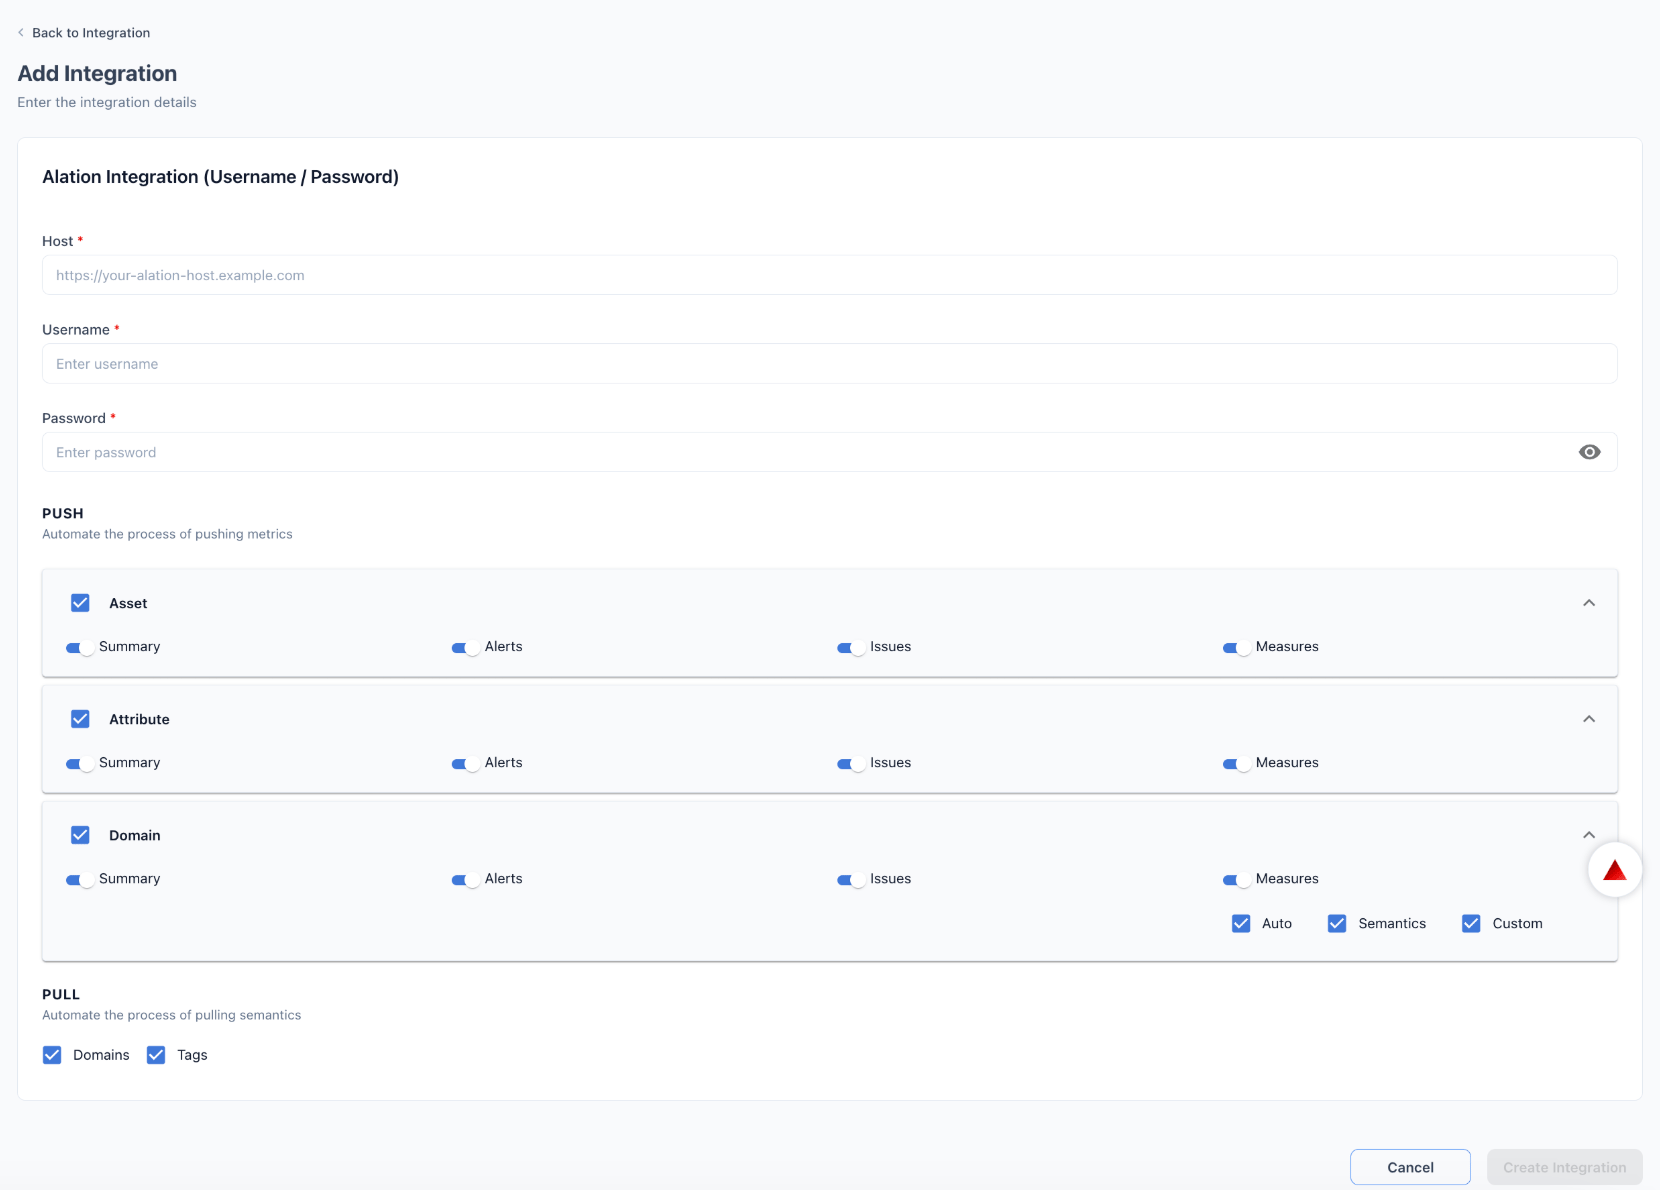
Navigate to Organization → Integration and locate the Alation entry in the integration list. Click the pencil icon to open the configuration form.Step 2: Enter authentication details
Prizm supports two authentication methods for Alation.Username / Password (recommended)
Enter the Host URL of your Alation instance (e.g.,https://yourcompany.alationcloud.com), the Username (email address of the Alation account), and the Password.
When you save the integration using Username/Password, Prizm automatically generates a Refresh API Token and stores it internally. Subsequent API calls use this token rather than the password directly — the password is only used during the initial connection handshake.
UserID / Token
Enter the Host URL, the numeric User ID of the Alation service account, and the Refresh Token. Use this method if you are managing token rotation externally or if your organization requires token-based authentication without storing passwords.A dedicated service account is recommended for both authentication methods. The account must have write access to catalog pages on the target datasource for PUSH operations to succeed, and read access to domain and tag data for PULL operations.
Step 3: Select the datasource
In the Datasource field, search for and select the Alation datasource that maps to the data source Prizm monitors. The datasource name must match the entry in your Alation catalog exactly.Step 4: Configure Push settings
The PUSH section controls what Prizm sends to Alation. Enable each object level and select the data types to push.1
Configure Asset push
Enable Asset to push data to Alation table (asset) catalog pages. Select which data types to push:
- Summary — overall quality summary and score for the asset
- Alerts — active alert details for the asset
- Issues — open issue details for the asset
- Measures — quality measure results for the asset
2
Configure Attribute push
Enable Attribute to push data to Alation column (attribute) catalog pages. Select which data types to push:
- Summary — column-level quality summary and DQ Score
- Alerts — active alert details for the column
- Issues — open issue details for the column
- Measures — quality measure results for the column
3
Configure Domain push
Enable Domain to push domain-level metrics and semantic context to Alation. Select which data types to push:
- Summary, Alerts, Issues, Measures — same as Asset and Attribute levels
- Auto — Prizm automatically maps assets to Alation domains based on existing domain assignments
- Semantics — pushes semantic metadata alongside domain metrics
- Custom — allows custom field mapping for domain-level pushes
Step 5: Configure Pull settings
The PULL section controls what Prizm imports from Alation on each sync cycle.- Domains — imports Alation domain assignments into Prizm as domain metadata on the corresponding assets
- Tags — imports Alation tags and applies them to the corresponding assets in Prizm
Step 6: Save and validate
Click Update Integration to save. Prizm validates the connection and starts the firstCATALOG_SYNC job based on your push and pull configuration.
Configuration reference
Scheduling sync
By default, the Alation sync runs when triggered by asset or measure evaluation events in Prizm. You can configure a fixed sync schedule to run catalog updates at regular intervals independent of individual asset events. Schedule options: Minutes, Hours, Days, Weeks, Month.When a schedule is active, automatic per-asset and per-measure sync triggers are disabled. The integration instead runs a full push of all configured metrics on the schedule interval. Configure the schedule to run after your metric evaluation jobs complete to ensure the latest results are always reflected in Alation.