
Overview
This guide describes how to configure Microsoft Entra ID (formerly Azure Active Directory) as the SAML 2.0 Identity Provider (IdP) for PRIZM. After completing the configuration, users assigned to the PRIZM Enterprise Application can securely authenticate using their Microsoft Entra ID credentials.Prerequisites
Before you begin, ensure you have:- Microsoft Entra ID Administrator privileges
- Permission to create Enterprise Applications
- Permission to configure SAML Single Sign-On
- PRIZM Administrator access
- PRIZM Service Provider (SP) details:
- Entity ID
- ACS URL
- Sign-on URL
Step 1: Configure Microsoft Entra ID
- Sign in to the Microsoft Entra Admin Center.
- Navigate to: Enterprise Applications → New Application
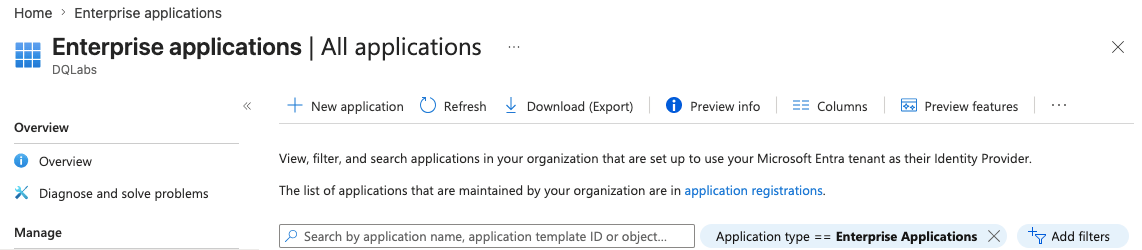
- Select Create your own application.
- Name the application PRIZM.
- Choose Integrate any other application you don’t find in the gallery (Non-gallery).
- Open the newly created application.
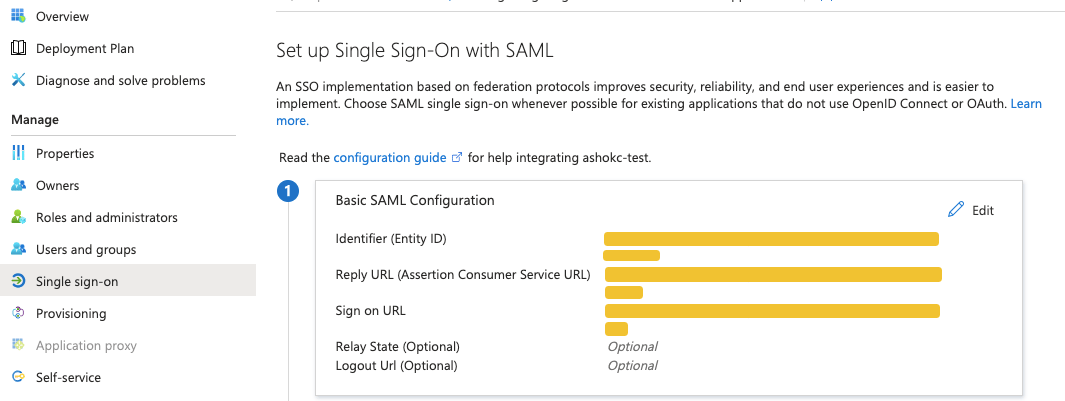
- Navigate to: Manage → Single Sign-On → SAML
- Configure the following values using the information available in PRIZM → Profile → Organization → SSO/SAML.
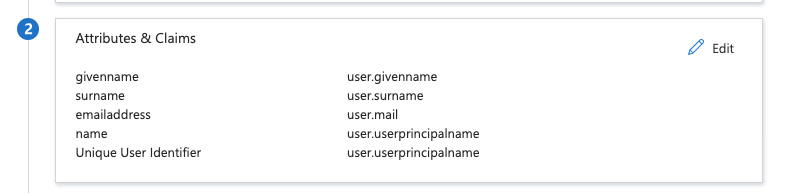
- Configure the required SAML claims.
- Save the configuration.
Step 2: Configure PRIZM
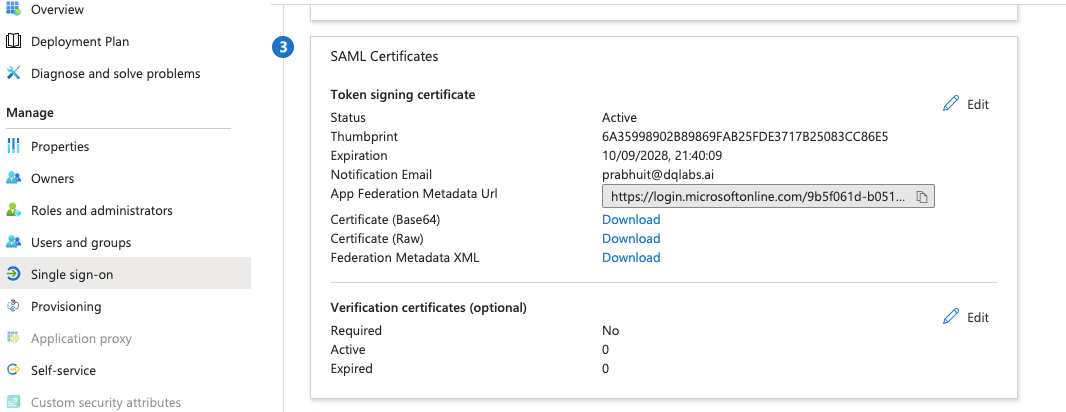
- In Microsoft Entra ID, navigate to the SAML Certificates section.
- Download the Federation Metadata XML.
- In PRIZM, navigate to: Profile → Organization → SSO/SAML
- Enable Single Sign-On.
- Select Microsoft Entra ID as the Identity Provider.
- Upload the Federation Metadata XML.
- Click Save.
Step 3: Assign Users
In Microsoft Entra ID:- Open the PRIZM Enterprise Application.
- Navigate to Users and Groups.
- Assign the required users or groups.
Step 4: Test Login
- Navigate to the PRIZM login page.
- Select Sign in with SSO.
- Enter your corporate email address.
- Authenticate using Microsoft Entra ID.
- Existing PRIZM users are authenticated.
- New users are automatically provisioned during their first login (JIT provisioning).
- Roles are assigned automatically based on incoming group mappings.
SCIM Provisioning (Optional)
- Navigate to Enterprise Applications → PRIZM → Provisioning.
- Select Automatic provisioning.
- Enter:
- Tenant URL (SCIM URL)
- Secret Token
- Click Test Connection.
- Configure attribute mappings.
- Start provisioning.
- Assign users/groups.